Friday, 29 April 2011

Space Monkey...


Like many long-time GW geeks I was overjoyed to discover that the new Grey Knight Codex would have a Jokaero model in it and that there would be a model produced. Unsurprisingly I purchased one.

The advantages of my new-found painting style were put into immediate action. As said, I tend to lose interest so I need to act quickly. I purchased my Jokaero on the Saturday morning of release and painted it that very afternoon. Took around 45 minutes.

Normally I use black undercoat but I had a plan for this one that meant using white. Basecoat was a dull flesh colour over the exposed skin and some quick highlights with mithril silver on his weapon array and digital weapons. I left the fur as white undercoat. I painted a layer of Devlan Mud on his underside, right over the white undercoat just to dull it down. Then, my custom Gryphonne Sepia/Asurman Blue mix over the flesh and Badab Black over the metal. Then came the fur. Three coats of Gryphonne Sepia straight over the white. Finally another coat of Sepia over the whole figure and a little retouching on the silver plus black for the eyes. Bingo: Space Monkey.

Came out nicely.

Thursday, 28 April 2011

Been painting...

I shall now return to a subject I've talked about before. It's all about painting technology and not getting caught up in spending a million hours painting one figure. I'm pretty well known for painting at Golden Demon with a fair amount of success. Last year I entered for the first time in five years and found myself a little bored with the process of display painting. I was just starting to think that I wasn't getting enough out for the effort put in. In the case of these particular minis I got a couple of demon trophies so I was both happy and proud but there was definitely the thought that I would never have wanted to bother if I wasn't entering a contest. So, it was around then I started looking at my painting hobby and what was important to me. I enjoy painting minis and have a bit of shiny-syndrome where I briefly want to paint all kinds of things but rarely get them finished. So, it was a case of starting to paint and ten being bored after the first hour or so and then a slog for the next few hours or however long it took to finish. The obvious strategy is to say that I should be painting minis in less than an hour each. This of course throws up a problem. It's tough to paint something aesthetically pleasing in less than an hour and I had no interest in painting figures that I didn't then enjoy looking at...

I looked at a couple of products that were designed for speeding the process up. Citadel Washes and Army Painter dip. There's a little stigma attached where it's assumed that these are quick ways of getting a figure on the tabletop but they wont look that great. I experimented with the Army Painter and it didn't work for me. Results weren't bad but it very much felt like a production line process that wasn't fun and 'painterly'. The Citadel Washes were far more interesting and I played a lot with finding how they work best.

The typical work process for these washes tends to be basecoat, wash and then highlight. Basically the traditional painters way. After a little messing about I felt that this wasn't getting the best out of them. Instead I used them as the final coat. So basecoat, highlight, wash. I also discovered that washing an area twice worked really well. The washes can be a little patchy as a final coat but a second coat evens things nicely. So, from there on it was all about working out what worked best under these circumstances.

One important lesson for me to learn was that with two washes at the end of the process you have to paint your basecoat much lighter than you'd normally go. I have learned that my new paint best friend is the Foundation paint Dheneb Stone. Many of my basecoats seem to be Dheneb Stone tinted with another colour. Bonus is that Dheneb has excellent coverage.

One of my experiments involved the new Grey Knights. Here is my Grey Knight Justicar. Mostly a basecoat with a single wash of Badab Black.


As an idea of what I was doing here is a pic of what one of my Greys looks like before and after that wash. Incidentally... Mithril Silver, Mithril and Burnt Umber ink for the gold, Blood Red.


Generally I'm quite happy with the results but there was a problem with the Grey Knights. I pretty much had to use the Badab Black wash but I feel it's too harsh. I was unable to do two layers to clean things up as even one layer was a bit too dark. It was at this point that I was crying out for GW to release a pigment free wash for altering the intensity of the washes. Thinning with water alters the properties too much and I have yet to find a medium to add that works.

So, I started playing with other minis and got onto one of my favourite things to do. I have learned that I like the effect of using all kinds of different washes for the first layer and then an all over wash of Gryphonne Sepia as the second (nobody ever suggested the two layers of wash had to be the same ones). I played with a couple of Lord of the Rings figures. First up, a Ringwraith...


This one had highlights drybrushed onto the robes and a little mud drybrushed around the lower edges. First wash was Thraka Green over everything except the metal which got Devlan Mud. I went with the Thraka Green to give him a slightly supernatural feel as in the movies. Then Gryphonne Sepia all over. Next up a Mordor Orc Slaver.


This was an interesting figure to do. In my older techniques I always got very annoyed at figures sculpted anything less than precisely. This one was quite rough in it's sculpture but had a good feel in general. Not getting hung up on painting the details is one of the strong points of my new technique so this guy was another quick and easy paint. Just Devlan Mud all over and then Gryphonne Sepia.

Lastly, for today, I wanted to have a go at trying my technique on something that would normally be a tough one to paint because of the detail levels. I decided to grab one of my 28mm Eolith Zombies. These are very finely textured figures so this would be a real workout to see the potential of the technique.


I think it came out well. Two coats of Gryphonne Sepia on the flesh and Devlan then Gryphonne on the rest.

Right now my new style is a work in progress. Plus I really need to work on my photography. New camera plus not having a proper setup at the moment means these pics are rather sub-par. Mostly that the colours are a little... dull. Regarding the painting I'm currently working hard on getting the basecoats right. I still have a tendency towards making them too dark so the end result is duller and not as three dimensional as I'd like. But, I'm getting there.

Also experimenting with wash concoctions for different effects. Still looking for a good way to take the intensity out of them. Really want a much weaker version of Badab Black and Devlan Mud. I think two coats of Badab Black at a quarter of it's usual intensity would be great for Grey Knight armour.

Last up I'd like to say that the longest time spent on any of these minis was 45 minutes on the Justicar. Most of the figures hover around the thirty minute mark. Nice to sit down and knock out a mini that quick and still be happy with the result.

Monday, 25 April 2011

Love... hate... Mithril...


Today I'd like to talk about Mithril Miniatures. They've been around for years producing miniatures based upon The Hobbit and The Lord of the Rings... and in their particular style sculpted by Chris Tubb.

Mithril has always been a funny one for me. I don't own too many of them but I have a strange fascination with them. People who know my work over the years probably wont be too surprised that I take a certain inspiration from them.


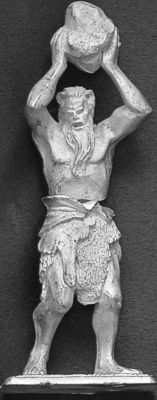
Take this giant. Obviously not a modern take on such a subject and it doesn't even have much in common with the classic styles of figure associated with, say, early Citadel, Grenadier or Ral Partha. No, it's undetailed but has a sculptural solidity that is rather out-of-step with nearly everything else in the miniatures world. But, you know, this is a mini I like to stare at once in a while. There's that fascination with just how little there is too it but how it still works for me.


I used to own this Saruman figure and it's perhaps a little more traditional but it's again, quite low detail and with long, clean lines. For me, yet again, it has that certain something.

Mithril is a funny entity as it seems that it's almost not part of our miniatures hobby. It's like a separate thing with Mithril collectors rather than miniature collectors. As a general rule I always love the idea of Mithril more than the execution.

A few people rather scoff at Mithril and their stubborn refusal to reinvent with a more modern sensibility but there's a part of me that likes and admires their traditional setup. That said, an easier to navigate website with better pics might be nice...

In the back of my head is the idea of one day playing with similar ideas for a range of my own figures. I've played with it a little in the past but never really dived in (look at Spyglass L'nissa and Naomi as examples). Just that idea of clean, low-detail sculptural figures but to my tastes... Hmmm.... one day...

Friday, 22 April 2011

Polymer Clay versus Epoxies... FIGHT!

I have probably touched on this in the past but I'll bring it to a head here. There's a war brewing, a war between sculptors. On one side are the sculptors who use epoxy putties such as Greenstuff and, on the other, sculptors using polymer clays like Fimo or Super Sculpey...

So, what's best?

This used to be a really simple argument. Epoxies were best. It had nothing to do with any sculpting properties of the material. It was far simpler. Minis were almost always moulded in a vulcanising press between two discs of black rubber. This meant the original sculpture would be put under physical pressure and a lot of heat. Epoxies are great at withstanding this as they're generally tough like boot leather but polymers aren't quite so durable under the circumstances. Apparently they are possible to mould this way but it's rather more awkward and risky. So, it was generally a case of 'sculpt in epoxy. Polymer Clay is a pain in the ass'.

Times have changed.

Tese days we have all kinds of convenient ways to mould figures. A particularly good scenario is to cast a figure in resin first and then, should you want to go the black rubber and metal figures route, you just cast a few masters in a resin that can withstand the process. Plus moulding for resin is a gentle process on the master so you can sculpt in practically anything...

To all intents and purposes there are really no technical reasons to choose one over the other in the modern sculpting world (though, if you are a sculptor, always best to check with any clients that they are okay with your choice). So, it's down to what they can do.

On paper I have to say polymer clay seems to have the trump cards. So, lets deal with that first...


This lovely figure is for the Dust game. I'll admit I'm not very familiar with it but I love this figure sculpted by MIKH. Very cool...

Polymer clays don't cure by themselves and require baking. The great advantage here is that you can work and rework areas constantly until you are happy. Epoxies cure by themselves so you're always under the pressure of getting your work done before it's unworkable. This reworkability and simply the ability to just work slowly without any worries is a godsend for a sculptor. Plus it's useful for layering detail. If you start adding extra details you can work them easily into complete areas. Say you want to add something hanging from a belt that would deform a tunic under where it lies. If you'd already sculpted in epoxy you'd have to drill out and redo the area or drop the item there without the deformation which would not look so good. Obviously the best plan for epoxy is to pre-plan and know it's going to be there but polymers give you the easy option of changing your mind. Overall polymers offer control and unparalleled flexibility in their process. It's small wonder that there are a lot of sculptors shouting it's praises and saying that epoxies just can't get it done anymore...

However... there's a flip side to the coin. You ask 'can it be done in epoxy?'. There seems to be a school of thought that suggest that no it can't. Mr Tom Meier would seem to disagree.


This is a 35mm pirate by Tom Meier. It's sculpted in good old greenstuff and this is the kind of thing that's supposed to be so tough in epoxy. All that layering of details. Obviously a lot of forethought in the sculpting process. It can be done, though it's perhaps not so easy to do.

But then epoxy has it's own advantages over polymers, and not just it's vulcanisation survivability. Epoxies cure over time and their sculpting properties change over that period. Very soft at first mix and all the way to tough and rubbery later on. It may seem like a downside but it's also a strength. Soft epoxy is great for laying down shapes but partially cured is wonderful for working fine details. Last night I was sculpting the eyes on a 5mm tall head and needed eyeball, upper eyelid and lower eyelid. I roughed it in fairly neatly but it was great to come back to it 45 minutes later and just refine the area with partially cured putty. And with no worries of distorting the area around it which was another 45 minutes down the curing process and holding it's shape nicely (with just a hint of flex that allowed for tiny changes).

There's also the whole 'not baking' thing. The great thing about that is that, assuming your epoxy figure is being moulded in a way that wont cause problems you can use pretty much any materials on it as they don't have to withstand the oven. Little bit of thin plasticard? No problem.

Oh, and once it's cured you don't have to panic that you're going to drop the figure and destroy all your work...

Frankly, in summing up I have to do the whole fence-sitting thing which is never good for a blogger. But what can you do? Truth be told polymer versus epoxy just comes down to personal taste and what works for you. Personally I work in epoxies but like to grab some polymer clay once in a while to try and get the hang of it. As yet I haven't quite done so, I think I'm still used to the working process of epoxy which is rather different though I do like seeing clay sculptors working (JAG's and Aragorn Marks's videos for Miniature Mentor were fascinating). I think before long I'll end up using both, depending on what I'm trying to achieve. And that's probably the best information to take from this post (along with it being blindingly obvious): the right tool for the job.

Thursday, 21 April 2011

Been busy...

Sorry for the lack of posts lately. Been a tad busy with one thing or another and some of these blog posts can be rather time-consuming to put together (when I'm supposed to be doing something else).

I don't really have anything major to say today, just wanted everyone to know I haven't forgotten about the blog. There's going to be a post very soon about my adventures in painting with Citadel Washes (I've been messing about a lot). There's a Space Monkey among them... but I need to set up a decent photography area to take proper photos.

In other news, things are starting to crystallise with regards to what I do next after resting the Eolith ranges. I've been mulling over a number of plans and have something I'd like to have a go at (and have even sculpted some stuff). Possibly a little different for me. But that's a tale for another day.

Hmmm... I should really offer some sort of useful info in this post.

... hokay!

Take a new pot of Gryphonne Sepia wash and add a few drops of Asurman Blue wash into it. This results in a lovely neutral brown wash that is much lighter than Devlan Mud which tends to darken things too much for my liking and doesn't heavily give a yellow tint like the sepia. A useful pot of paint to have...

Tuesday, 12 April 2011

Ogres style makeover...

Today I'd like to put on my best Daytime TV Personality cheesy grin and bad suit to talk about a couple of miniatures that I would love to do a modern day resculpt of... and they're both GW Ogres.

In both cases they are figures that are remarkable for their age (both hailing from the mid eighties) but I'd just love to see a modern styled version of. Yes, these are actual projects I am considering doing from a purely hobby standpoint. And yes that means that I wouldn't be selling any. This is just a hobby geek thing...

First off we have Hrothyogg, a genuine classic of 80s Warhammer and, if memory serves was in the top ten Warhammer Miniatures of all time when this was run down on the GW website (pretty sure it was a public vote).


Yep, he's pretty awesome and, after many years of not owning one, I finally got my grubby mits upon one a few weeks ago (thanking kindly one of the readers on here). I think I shall be drowning him in Gryphonne Sepia pretty soon...

I've been thinking about an Ogre army for myself a fair bit over the years and I'd love this guy to lead them. Just one problem. As lovely as he is, stylistically he doesn't fir with modern GW Ogres and he's also pretty tiny in comparison. So, I'm thinking about sculpting my own new version the size of a Tyrant. Will probably make some design changes but would basically be this guy in the same pose but with the size and anatomical type of the new Ogres.

Secondly up is another Ogre from another game: Blood Bowl. I have a love of Blood Bowl going WAAAY back and have had the honour of sculpting a couple of teams for GW in the past. Fun projects both. The Ogre in question is the original Ogre from 1st edition Blood Bowl. Very small by Ogre standards but, for me, the best design of a Blood Bowl Ogre ever.


Like Mr Hrothyogg, it's about updating the size and style rather than the design. He'd be a great centrepiece for a new Blood Bowl team. Built like a tank and spiky like a porcupine.

Maybe I'll find the time one of these days.

It all feeds back into that idea of dream miniatures. The ones we wish we had. As a sculptor who has run his own companies I've mostly been able to achieve these (such as my 54mm Dracula which I really must paint one of these days) but others are not my IP and thus are a problem unless I can find some disposeable sculpting time. These are just two of my dream sculpts; two of the ones based on GW's IPs but there are others and I'll probably talk about them sometime.

Curiously enough, one of my dream sculpts was Mean Machine Angel from the Judge Dredd universe. I actually got to sculpt him early in my career. I'd have loved to take a better stab at that with the benefit of some actual skill... but might happen as a hobby project one day. Plus we like Mean not having any hands to sculpt... I mean... that's the sculptor's dream...

And Steve has blathered once more (with pics).

Saturday, 9 April 2011

Three months in... and a bit...

Well, the Asylum is still hobbling along in it's own special way and I'm still finding things to talk about once in a while so it's all good. Hopefully people are still interested in what I have to say.

Just past 12000 page views over the course of the blog since the beginning.

In march I had exactly 5001 page views. That was pretty awesome.

70 followers now. Hi everybody!

The vast majority of page views come from the UK. Surprisingly, Finland is second with the USA just behind.

Most of you are using Firefox.

Two thirds of readers are using Windows (I'm not one of them).

The most popular of my posts was the one about the Great Spined Dragon and it's general excellence.

So, at this juncture I should like to ask you all... what would you like to see from Spyglass Asylum in the coming months?